Make world a better place to live

Make world a better place to live
Dedicated in Rememberence of my pet "Timmy"

Sep 12, 2010

How to set up a wireless network (PC to PC) without a router


Wireless networks are helpful because they let you use your computer and connect to the Internet anywhere in your home or office. However, most wireless networks use a wireless router, which can be expensive. If you have more than one computer, you can set up a wireless network without buying a wireless router and save yourself some money.


In a traditional wireless network, a wireless router acts as a base station, much like the base station for cordless phones. All wireless communications go through the wireless router, allowing nearby computers to connect to the Internet or to each other.

Ad hoc wireless networks work more like walkie-talkies, because the computers communicate directly with each other. By enabling Internet Connection Sharing on one of the computers, you can share Internet access.


Ad hoc networking might seem like a much smarter alternative to using a wireless router, but it does have a couple of disadvantages:
If the computer connected to the Internet is shut down, all computers that are part of the ad hoc network lose their Internet access.
To connect to the Internet, one computer always needs a wired network connection.

To connect your computers to the Internet using an ad hoc wireless network, follow these high-level steps (described in more detail later in this article):

1.
Enable Internet Connection Sharing on the Internet-connected computer. You can skip this step if you don't need to access the Web.
2.
3.

How to enable Internet Connection Sharing
On networks with wireless routers, the router has the important job of forwarding communications from the computers on your home network to the Internet. On ad hoc networks, you must designate one computer to serve this role. The computer you choose must have a wired connection to the Internet, and it should be left on whenever you want to be able to use your other computers.

Procedure to set up the first(Main) computer
To set up an ad hoc wireless network that allows computers to share an Internet connection without a router  the procedure is :-
1.
2.
Click Start, and then click Control Panel.
3.
Under Pick a category, click Network and Internet Connections.

4.
Under or pick a Control Panel icon, click Network Connections.


5.
Right-click your wireless network connection, and then click Properties.


6.
In the Wireless Network Connection Properties dialog box, click the Wireless Networks tab.


7.
On the Wireless Networks tab, under Preferred networks, click Add.


8.
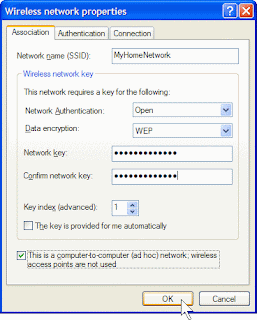
In the Wireless network properties dialog box, on the Association tab, type the name of your ad hoc wireless network in Network name (SSID) box (shown in step 10). For example, you could name your wireless network MyHomeNetwork.
9.
Clear the The key is provided for me automatically check box and select the This is a computer-to-computer (ad hoc) network check box.
10.
Create a 13-digit password and type it in both the Network key and Confirm network key boxes. For the best security, include letters, numbers, and punctuation. Then click OK.


11.
Click OK again to save your changes.


How to set up additional computers
If the computer you want to add to your network does not have built-in wireless network support, install a wireless network adapter.
Windows XP automatically detects the new adapter and notifies you that it found a wireless network.

Now connect your computer to your wireless network
Note: These steps apply only if you're using Windows XP Service Pack 2 (SP2). If you haven't installed SP2, visit Microsoft Update to install it before connecting to the ad hoc network.

1.
Right-click the Wireless Network icon in the lower right corner of your screen, and then click View Available Wireless Networks.


2.
The Wireless Network Connection window appears and displays your wireless network listed with the SSID you chose. If you don't see your network, click Refresh Network List in the upper left corner. Click your network, and then click Connect in the lower right corner.


3.
Windows XP prompts you to enter a key. Type your encryption key in both the Network key and Confirm network key boxes, and then click Connect.


Windows XP shows its progress as it connects to your network. After you're connected, you can close the Wireless Network Connection window.
Repeat these three steps on each computer that you want to connect to your ad hoc wireless network.
Now you're ready to browse the Web wirelessly, from any computer you add to your home network.

                                                                             Source of information :- Microsoft  Corporation

Aug 15, 2010

Procedure to connect Mobile phone as a Modem for internet access in Windows XP


Note :- First configure the settings in the phone  and GPRS should be working in phone before you go to configure a modem also in case of dual sim phones don’t  forget to place the sim in slot1 position from which you want to access .


Note :-  1).Connect the mobile to the PC using data cable.
 2). After connecting to PC the phone shows some options like
a).Mass storage
b).Webcam
c).COM port
 3). Select  the COM  port option and press OK.


After that your system shows “New hardware found wizard”, choose “install the software automatically” from the option first and click on next button, then your system searches for the requires USB driver, if it is unable to do so then choose the option “install from a list or specific location” and click on next.


Then browse   the  location of the the USB driver for your device and select ok as shown above.


Click on next and your system starts installing the USB driver for your device
while installing it sometimes your system shows “compatibility wizard”, if this happens choose “continue anyway”


Click on “Finish” to complete the wizard.
Now your system shows  “new hardware installed is ready to use”, it means you successfully install the USB driver for your device (mobile).
Now right click on the “My computer” and choose “properties”.


From “system properties” choose the “Hardware” tab and click on “Device manager”.


In “Ports (COM & LPT)”option  remember  the port location of your device i.e.COM10 etc and then close the window.
Now open the CONTROL PANEL as  START > SETTINGS > CONTROL PANEL and Choose  “phone and modem option”. If you are first time creating modem, XP will ask for Area STD code , enter it and press ok.


then “phone and modem option” window will open  as above, click on “Modem” tab and choose “Add”.

Check the option “don’t detect my modem, I will select it from a list” and click on next.


Then choose the option “Have Disk” as shown above.


Browse the location of the “USB Modem driver file” of your device and press “ok”


Then click on next


Choose the right port(i.e.the port on which your phone is connected) from the option as you create earlier and click on next.


Click on “continue Anyway” in compatibility wizard
Now wizard prompt that your modem is installed successfully so click on “finish”.


Now again open the “phone and modem option” and click on “properties” after selecting your modem from the list.


Click on “Advanced” option tab and in Extra initialization commands put the Command given by your Mobile service operator, here I am providing some commands for your convenience


After that choose ok and close the window.

Creating Dial-up connection


Now choose “My network places”


Click on view network connections


Then choose “create new connection”
Now “welcome to the new connection wizard open” .
Click on Next.
Then choose “connect to internet” and click Next.
Then choose “setup connection manually” and click on Next.
Then choose “connect using dial up modem” and click on Next.


If your system have many modems then this  window appears, choose from the list the right modem and click Next

Write down the ISP name or name of your choice in the wizard opened and click Next.
Enter the Dialing Number in case of Aircel and Airtel it is “ *99***1#” and click next.


Left “username” and “password” section blank and click on Next
Click on finish to complete the wizard.


Now your dial-up connection is ready simply dial it , in case if it shows error then click on
Properties > security tab > check “allow unsecured password” in box and press ok

When your connection is established XP will show the Connection bandwidth as shown above. Now open your web browser and enjoy the internet access, and if you want to enjoy better speeds then go for some EDGE enabled mobile phone.

Enjoy

Regards
Rishi Kumar

Jul 4, 2010

Pushmail Settings for yahoo and Gmail accounts in mobiles


Dear friends,
If you are searching for push mail settings for "Gmail" and "yahoo mail" then your search ends here. It’s easy to configure Gmail push setting as compared to yahoo mail settings.
Here I am providing step by step details that " how to configure push mail setting in your mobile ".
The setting given below is for "MicromaxQ5fb" but you can easily configure it to other mobiles too.
First make sure you select the proper data account (e.g. : Airtel GPRS or whatever you have).
For Gmail, the settings are:-
For example“MicromaxQ5fb” push mail settings are given below :-
First go to Services->Email->Accounts and select New Account.
1. Email address – Enter your email address in full (eg : xyz@gmail.com)
2. Display name – Enter name of your choice
3. User Name – Enter your full user name – eg: abc@gmail.com
4. Password – Enter your password
5. Outgoing server - smtp.gmail.com
6. Incoming Server - pop.gmail.com
7. Advanced settings :-
i). Account settings:-
Account name :-Gmail
Data Account :- Mobile office/pocket internet etc.
Protocol :- POP3
Check interval :- Off
Email notifications :-Disabled
Download size:- 102400 or default
Retrive amount :- 500 or default
Reply to address : - Leave blank
ii). Outgoing Server
Outgoing port – 465
Security - SSL/TLS
Authentication - ON
iii). Incoming Server
Incoming post - 995
Security - SSL/TLS
Download options - Download all
Copy on server - On
Delete server Email - Off
iv). Signature
Auto signature -Off
Signature image - choose someone or leave it it will choose automatically when you login
Signature text - Leave blank
For yahoo mail settings :-
Note :- In case of yahoo mail you also need to enable “Web & POP Access” on your Yahoo Mail account to send and receive Yahoo! Mail messages through push mail service.
Use the following steps :-
* Log on to your Yahoo mail account
* If you’re using the new Yahoo Mail interface, Click “Options” in the upper-right corner of the page, then choose “Mail Options” from the pull-down menu and On the left side of the page, select the “POP & Forwarding” option. If you’re using the original Mail interface, click “Mail Options” in the upper-right corner of the page, then click the “POP Access and Forwarding” link.
* On the “Pop Access and Forwarding” page, choose the “Web & POP Access” section.
Next you need to configure your Yahoo POP3 and SMTP settings into your mobile to access Yahoo mails through push mail service.
For example“MicromaxQ5fb” push mail settings are given below :-
1. Email address – Enter your email address in full (eg : xyz@yahoo.com)
2. Display name – Enter name of your choice
3. User Name – Enter your full user name – eg: abc@yahoo.com
4. Password – Enter your password
5. Outgoing server - plus.smtp.mail.yahoo.com or smtp.mail.yahoo.com (port 25)
6. Incoming Server - plus.pop.mail.yahoo.com or pop.mail.yahoo.com (port 110)
7. Advanced settings :-
i). Account settings:-
Account name :- yahoomail
Data Account :- Mobile office/pocket internet etc.
Protocol :- POP3
Check interval :- Off
Email notifications :-Disabled
Download size:-102400 or default
Retrive amount :-500 or default
Reply to address :- Leave blank
ii). Outgoing Server
Outgoing port – 465
Security - SSL/TLS
Authentication - ON
iii). Incoming Server
Incoming post - 995
Security - SSL/TLS
Download options - Download all
Copy on server - On
Delete server Email - Off
iv). Signature
Auto signature -Off
Signature image - choose someone or leave it it will choose automatically when you login
Signature text - Leave blank
---------------------------------------------------------------------------------------------------------------------------------------

General information for configururation of Yahoo POP3 and SMTP accounts in other mobiles phones:
Find below the basic Push mail settings that you need to configure in other mobiles other than Micromax.
* Incoming Mail (POP3) Server: pop3.mail.yahoo.com (Use SSL, port: 995)
* Outgoing Mail (SMTP) Server: smtp.mail.yahoo.com (Use SSL, port: 465, use authentication)
* Account Name/Login Name: Your Yahoo! Mail ID (your email address without the “@yahoo.com”)
* Email Address: Your Yahoo! Mail address (e.g., user@yahoo.com)
* Password: Your Yahoo! Mail password
Now just activate the account and enjoy your push mail account.
Have a nice day

Regards
Rishi kumar